System information on MS-DOS: CheckIt

We will quickly go through two tools today, or more precisely two versions of the same tool used to gather information about the current system. You see, questions about the system were usual in the MS-DOS days, so these tools did not wait to appear. We saw that even Norton Commander, a file manager, took liberty to have a few screens dedicated to this task, and the same with other file managers.
Of course, you could use general MS-DOS commands to get some sparse information from here and there. You could use mem and dir for example, but MS-DOS was built for businesses and corporations, so nobody had time to teach staff how to quickly answer hardware related questions. One of the better system information tools, and the one I also had, was CheckIt. There were quite a few versions of it, including a Windows 95 version, but I only had two MS-DOS versions and that’s what we will explore today. You can get both versions from WinWord and from my GitHub.
Before continuing though, I must be inappropriate and take a stab at Linux which has very few such tools and had none back in the MS-DOS days. This is what it means to build a business and staff-oriented operating system. If the command line is taken for granted in a server and machine-oriented operating system, in MS-DOS it could not. People needed tools, graphical tools even, to answer questions and get their jobs done.
So how did CheckIt look?

CheckIt version 3.0 had a good text-based interface, which was quite easy to maneuver. It was centered around the main top menu, which would be pre-opened at start exactly on what customers needed most: the system overview. This way, you could instruct a client to start CheckIt and press enter and read the information on the screen. They would get it right:
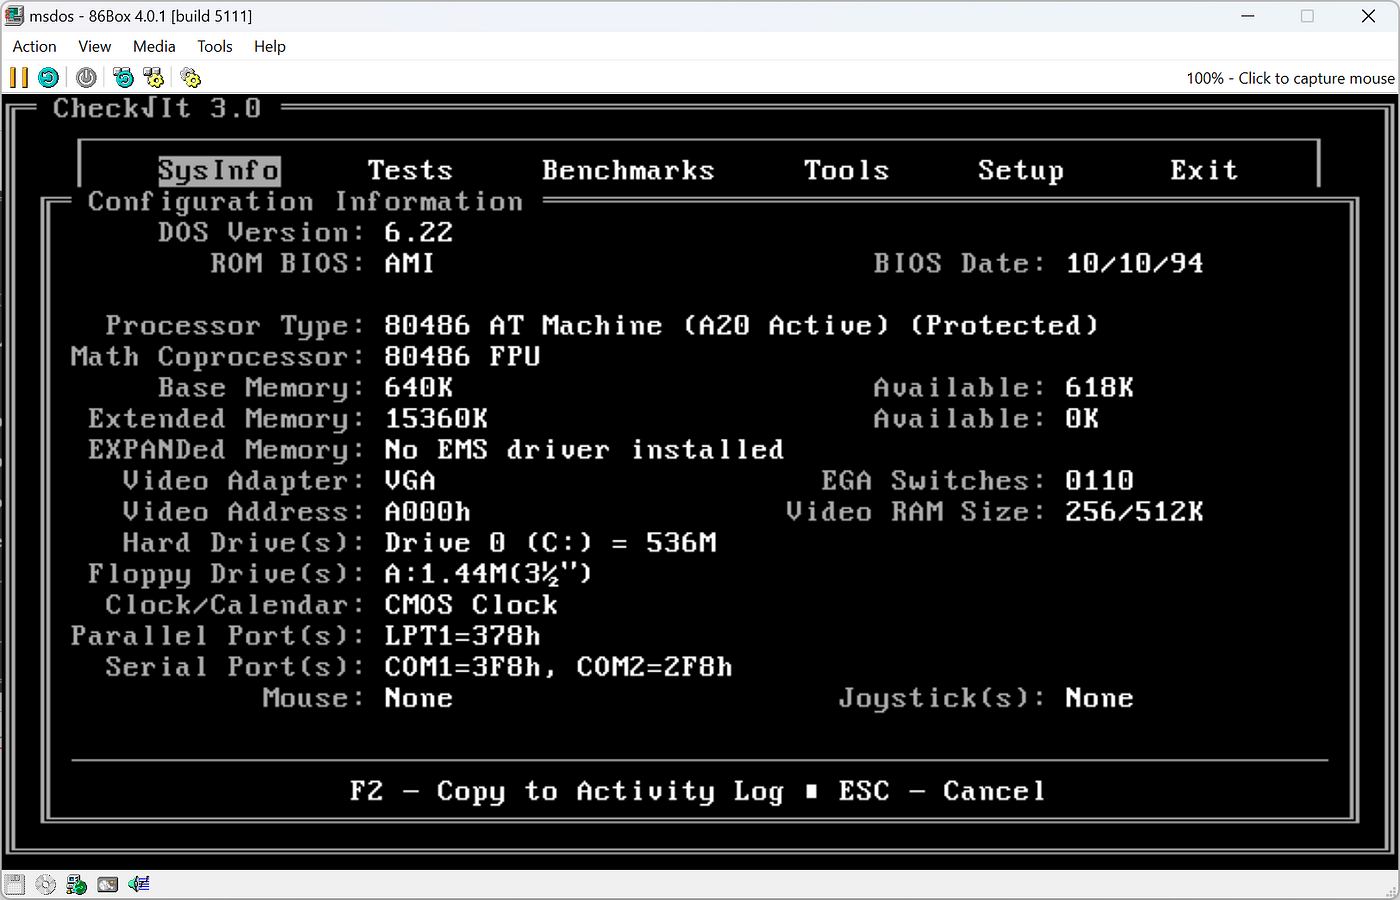
Note the amount of information on screen. You get a serious overview that allows you to understand what you are dealing with. It’s a 486 system with a numeric processor, 16 MB of RAM with 618 KB base RAM available, a VGA card, a 540 MB hard drive, and running MS-DOS 6.22. This way, you could for example get a feeling of the available RAM, to understand if the system is overloaded with drivers or other potentially unneeded software. For more RAM information, there is the Base Memory Map option in the main SysInfo menu:

Above we see the base RAM configuration, meaning the 640 KB part of the whole memory. We can see exactly how much is available and where in the order of things it is located. Right after the programs, which are after the interrupt vectors. The first version of this software was built in 1988 and had basically the same interface and features. In a time when there was no such thing as UI design as a business, nor properly cemented guidelines. Considering all that, CheckIt did an excellent job with their rudimentary, text-based interface.
The control was great too. Intuitive arrow presses and enter: that was all we needed to access the features put forward by the application. And talking about features, developers didn’t compromise at all. We can press enter on the above screen to dig deeper into a memory area:

Above we see the Video ROM, belonging to our video card, a Trident card from 1994. We can also see the interrupts, another important aspect of an MS-DOS system dealing with hardware devices:

We can see the serial ports, the parallel port, the floppy drive, even the system timer. Every hardware part had an interrupt port in MS-DOS. And knowing their layout was an important part of debugging malfunctioning devices or finding out how to load device drivers. Much like the lspci or lsusb commands in Linux.

Above we can see the CMOS table with all the information we usually see when accessing the BIOS at boot. We can also see the loaded MS-DOS device drivers in the Device Drivers screen, again accessible from the SysInfo menu:

Before moving on, I would like to take a moment and let all the above sink in. The amount of information is staggering. CheckIt goes all in, leaving nothing out. You don’t have to go around typing arcane commands in the terminal. Everything is collected and organized for you in a very intuitive interface, instead of blurted out in a huge text dump. In a few arrows key presses and an enter, you have a wealth of information about the category you chose.
But wait, there is more!

But did CheckIt stop there? No, the developers wanted more. Businesses wanted more. What good is it to have hardware information if you cannot test it? And since a lot of computer technicians would perform routine checks on hardware to see if anything is wrong, CheckIt added a whole menu called Tests, exactly for that, as we see in the screenshot above. You can test a lot of things here: the memory, disks, ports and many more. Here is the memory test for example:

Those days hardware faults were more prevalent, and routine checks for those were like routinely checking for computer viruses, or casual pings over the network. These days memory has self-correcting features and other ways of managing hardware faults. But back then, memory faults were prevalent indeed. And having such a quick way to check for them was required. Here is another set of tests for the system board:

As we see, it performs generic checks for simple CPU and FPU or numeric processor functions. There is even a clock test because MS-DOS had no network time synchronization, and had to rely only on the board’s real time clock and its own clock settings:

Note the weird delay between the real-time clock and the DOS clock. The test would see if the delay was tolerable and pass. And here is the video RAM test, filling the video RAM with predictable data and testing if it is displayed correctly:

We want even more!

As with all MS-DOS software of the era, where a file manager would try to be everything for everybody, CheckIt also had benchmarking features on top of everything else. You could test your system using the Benchmarks menu and would get the screen below:

Dhrystones was an integer only operations counter developed in 1984. It is not used anymore since we have more complex benchmarks now targeting all operations available to the CPU, but back then it was a good measure. After testing was done, a simple and understandable summary was shown:

The current system is compared above with the IBM XT computer, giving wild differences which are not exactly useful, but we could load other PC profiles to compare against, such as the 386, 486 and more.
CheckIt went on to become CheckIt Pro, which would bundle even more features like CMOS editing, all in a polished graphical yet still text-based interface:

With even better summaries and detailed views, better overall readability due to more modern tendencies, the application was indeed the best way of analyzing and understanding the computer hardware:

CheckIt went on even in the Windows 3.11 and Windows 95 era, called WinCheckIt 2.0 and 4.0, available both on WinWorld. I never had those versions because by the time Windows 95 hit, it provided the Device Manager which offered a sufficient and comfortable view of the available hardware.
This is also where the article ends. And I have to say, revisiting CheckIt left me impressed again. The simplicity, intuitiveness and number of features crammed into a few megabytes package is so fundamentally different than what is happening today with software. No bloat, no ads, each kilobyte well thought out to include needed functionality, sometimes extra functionality which was always on point. Thank you for joining me again in this nostalgic trip and see you next time!