How to automate log scanning with fail2ban
In the past few articles we learned to run several checks on the home network and get data and statistics about its performance. Then we learned how to check the Linux logs and interpret them to see actions happening in our network and on our devices. Every SSH connection is logged, every system login is logged, every wake up event: Linux logs everything. All this is very convenient not only because it helps us understand our systems, but also because there are tools that automate log scanning: fail2ban is one of them.
Automated log scanning works like this: the scanner runs as a service and it continually monitors all log files. On every change, they scan the added log entry and run it through the defined scan rules. If a rule matches, the corresponding defined action is executed. The rules can be anything: a matching application, timestamp, user or log message. So let’s see how fail2ban does all that.
Installing fail2ban and getting to know the configuration file
First, let’s install fail2ban. We are using Fedora for this exercise, but it’s available for Debian too using apt.
#sudo dnf install fail2banTo enable the fail2ban service, we execute the familiar:
#sudo systemctl enable fail2ban
#sudo systemctl start fail2ban
Let’s take a look at the fail2ban configuration file: /etc/fail2ban/jail.conf. The way it works is again, familiar: you have a bunch of default settings in the conf file and then we create a conf.local file to add and overwrite existing settings. This way we can always revert back to the defaults by removing the conf.local file.
The default behavior of fail2ban is to look for failed login attempts and ban the corresponding IP using a firewall rule. That’s why we’ll find many settings that deal with this scenario and we will see further below how we can execute anything for a given log entry. Banning, even if set to permanent, will not rewrite your firewall rules forever. If you restart fail2ban, all firewall rules will be removed and fail2ban will start again to scan the logs, banning IPs as it sees fit.
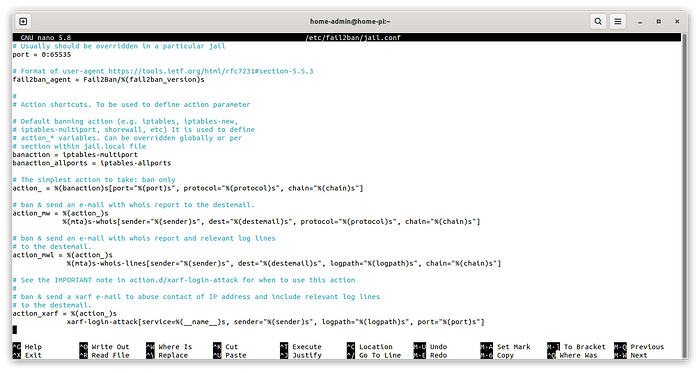
The most important settings are found around the middle of the file:

Ban time is defined with the bantime option and the default is 10 minutes (10m). To ban an IP forever we simply set this option to -1. Banning for 10 minutes is good for slowing down an automated bot to keep trying logins but I usually prefer to dismiss the attack forever so I switch to -1. Another useful option is maxretry with a default value of 5. If an attacker tries to login with SSH for example for 5 times and fails, it will be banned. Again, I usually change this value to 3.
If you look further down below you will find the default ban action, which is to add iptables rules. There are also actions defined to ban and send a notification email using sendmail. A proper sendmail configuration is needed and we’ll see how to implement it:
Below all that you will find the jails. A fail2ban jail is a log filter combined with a set of actions to perform when the filter finds something in the logs. So if we look for example at the SSH jail, the default configuration will look like this:
[sshd]
port    = ssh
logpath = %(sshd_log)s
backend = %(sshd_backend)s
In this case, the filter is sshd defined in /etc/fail2ban/filter.d/sshd.conf. And the configuration options are the SSH port, the log location and the backend, defining the way the log is read (polling or other more efficient methods if available). No action is defined (action = ) because the default action is used, configured earlier.
Let’s see the jail for nginx:
[nginx-http-auth]
port    = http,https
logpath = %(nginx_error_log)s
The filter now is nginx-http-auth, it’s located at /etc/fail2ban/filter.d/nginx-http-auth.conf and looks like this:
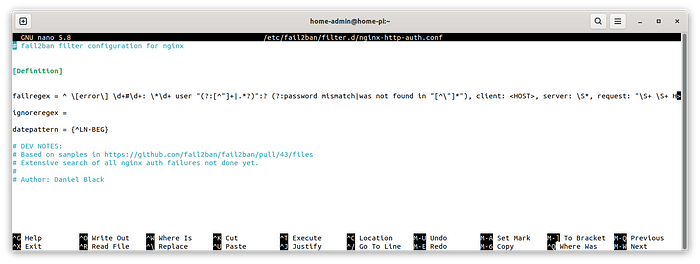
You can see there the filter’s definition: it’s a complicated regex expression but in the end, it simply looks for a password mismatch string.
Configuring fail2ban to ban failed SSH login attempts
To enable a jail, we need to set the enabled = true option. The default value for enabled is false and it’s intentional. This way you can start fail2ban and nothing would happen, making sure you don’t mistakenly start unwanted banning operations. So let’s create our jail.conf.local to override the defaults:
#sudo nano /etc/fail2ban/jail.conf.localHere we change some defaults and we add actions for SSH:
[DEFAULT]
ignoreip = 127.0.0.1         # this device
ignoreip = 192.168.68.108    # my desktop
bantime  = -1                # permanent ban
maxretry = 3                 # allow 3 matching logs before ban[sshd]
enabled = true
The default ban action is iptables-multiport, but we can also use UFW if we have it instead of iptables:
[DEFAULT]
ignoreip  = 127.0.0.1         # this device
ignoreip  = 192.168.68.108    # my desktop
bantime   = -1                # permanent ban
maxretry  = 3                 # allow 3 matching logs before ban
banaction = ufw[sshd]
enabled = true
We can also use UFW only for the SSH jail:
[sshd]
enabled = true
action  = ufw[name=SSH, port=ssh, protocol=tcp]
Setting up email notifications
You have a default mail configuration in fail2ban, located in the usual jail.conf file:
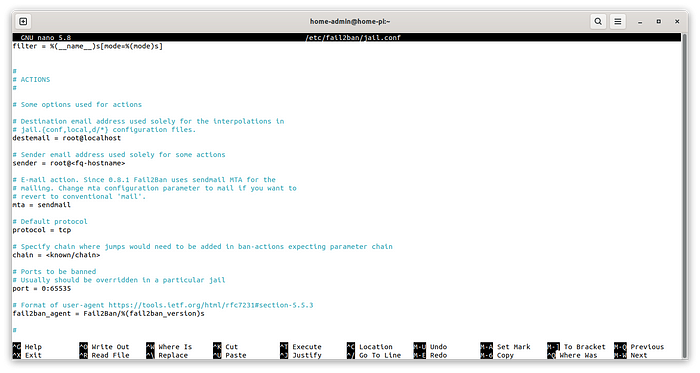
But you will probably want a different sender and destination, so we need to update our jail.conf.local:
[DEFAULT]
ignoreip = 127.0.0.1         # this device
ignoreip = 192.168.68.108    # my desktop
bantime  = -1                # permanent ban
maxretry = 3                 # allow 3 matching logs before bandestemail = yourname@example.com
sender = yourname@example.com
sendername = fail2ban[sshd]
enabled = true
action = %(action_mwl)s
The action we defined in sshd will trigger fail2ban to send a notification email after banning the offending IP. This will use sendmail so you have to have it installed and configured. The easiest way to configure sendmail with gmail for example is this:
#sudo dnf install sendmail sendmail-cf make
#sudo systemctl enable sendmail
#sudo systemctl start sendmail#sudo mkdir /etc/mail/authinfo
#sudo chmod 700 /etc/mail/authinfo
#sudo nano /etc/mail/authinfo/smtp-auth
Add this into smtp-auth:
AuthInfo: "U:root" "I:user@gmail.com" "P:gmail-password"Note that for the gmail-password you will need to create an application password from google if you are using two factor authentication. Next, we need to create the sendmail authentication hash map:
#sudo cat /etc/mail/authinfo/smtp-auth | sudo makemap hash /etc/mail/authinfo/smtp-authAnd now we can edit the sendmail configuration file located at /etc/mail/sendmail.mc and add the following text above the mailer definitions, usually located at the bottom of the configuration file:
define(`SMART_HOST',`[smtp.gmail.com]')dnl
define(`RELAY_MAILER_ARGS', `TCP $h 587')dnl
define(`ESMTP_MAILER_ARGS', `TCP $h 587')dnl
define(`confAUTH_OPTIONS', `A p')dnl
TRUST_AUTH_MECH(`EXTERNAL DIGEST-MD5 CRAM-MD5 LOGIN PLAIN')dnl
define(`confAUTH_MECHANISMS', `EXTERNAL GSSAPI DIGEST-MD5 CRAM-MD5 LOGIN PLAIN')dnl
FEATURE(`authinfo',`hash -o /etc/mail/authinfo/smtp-auth.db')dnlMAILER(`smtp')dnl
Rebuild the sendmail configuration and restart the sendmail service:
#sudo make -C /etc/mail
#sudo systemctl restart sendmail
Sending email notifications for device sleep events
We talked a lot about network diagnostics and using the Linux logs and since fail2ban is able to continuously scan the logs, this means we can trigger email notifications for example for device sleep events. Or for failed mtr scans, or for slow iperf3 checks and so on.
To do that, we need to create a new fail2ban jail. Let’s edit our jail.conf.local file:
[DEFAULT]
ignoreip = 127.0.0.1         # this device
ignoreip = 192.168.68.108    # my desktop
bantime  = -1                # permanent ban
maxretry = 3                 # allow 3 matching logs before bandestemail = yourname@example.com
sender = yourname@example.com
sendername = fail2ban
mta = sendmail[sshd]
enabled = true
action  = %(action_mwl)s[sleep]
enabled = true
action  = %(mta)s-whois-lines[sender="%(sender)s", dest="%(destemail)s", logpath="%(logpath)s", chain="%(chain)s"]
We need to create a sleep filter:
#sudo nano /etc/fail2ban/filter.d/sleep.confAnd paste the simple filter rule inside:
[Definition]
failregex = Waking up from system sleep state
ignoreregex =
datepattern = ^\[%%d/%%b/%%Y %%H:%%M:%%S\]
This will search our logs for “Waking up from system sleep state” entry and when found will send an email about it. Note the action we defined in the sleep section in our jail.conf.local. We are not executing the usual %(action_mwl)s because that also bans the offending IP found in the logs. But in our case, we don’t have an offending IP and there is nothing to ban. We just want to automate sending an email on each wake up log entry. So we simply use the mta action which sends an email. Of course, we can do this for any event we want from the Linux logs.
If we want to simply ban IPs using fail2ban, configuration is minimal. You simply create your jail.conf.local and enable the sshd jail. If you want to send emails, you need to configure sendmail first and that is a bit of work. If you want to trap all sort of custom log entries, you need to create filters for each event in the /etc/fail2ban/filter.d folder. As expected, configuration gets more and more complicated as we add automation features. But even so, fail2ban proves to be a very good log automation tool and I love to use it, even if just for banning IPs.
I hope this tool will prove useful to you. For every open port on your system and every forwarded port on your router, you should immediately configure a fail2ban jail. You will not believe how many automated scans happen over the Internet at all times. This is the least you need to do to remain sane in the midst of all the compromised Internet traffic. Ban unwanted IPs and see you next time!